Are you setting up an email under your own domain hosting at Dreamhost on your iPhone? Are you looking for how to set up Dreamhost email on your iPhone? This article shows you how to set up Dreamhost email on iPhone. Includes information like Email client configuration overview, iPhone mail client troubleshooting…
Table of Contents
DreamHost email settings
Dreamhost is a very quality Shared Hosting provider at a very affordable price. With the Dreamhost Shared Unlimited package, Email Hosting is included and is completely free to use. Note that this article shows you how to set up the DreamHost email that comes with the Shared Unlimited plan. With Shared Starter plans, email hosting is not included which you have to buy for $1.67/month.
To find DreamHost email settings, follow these steps:
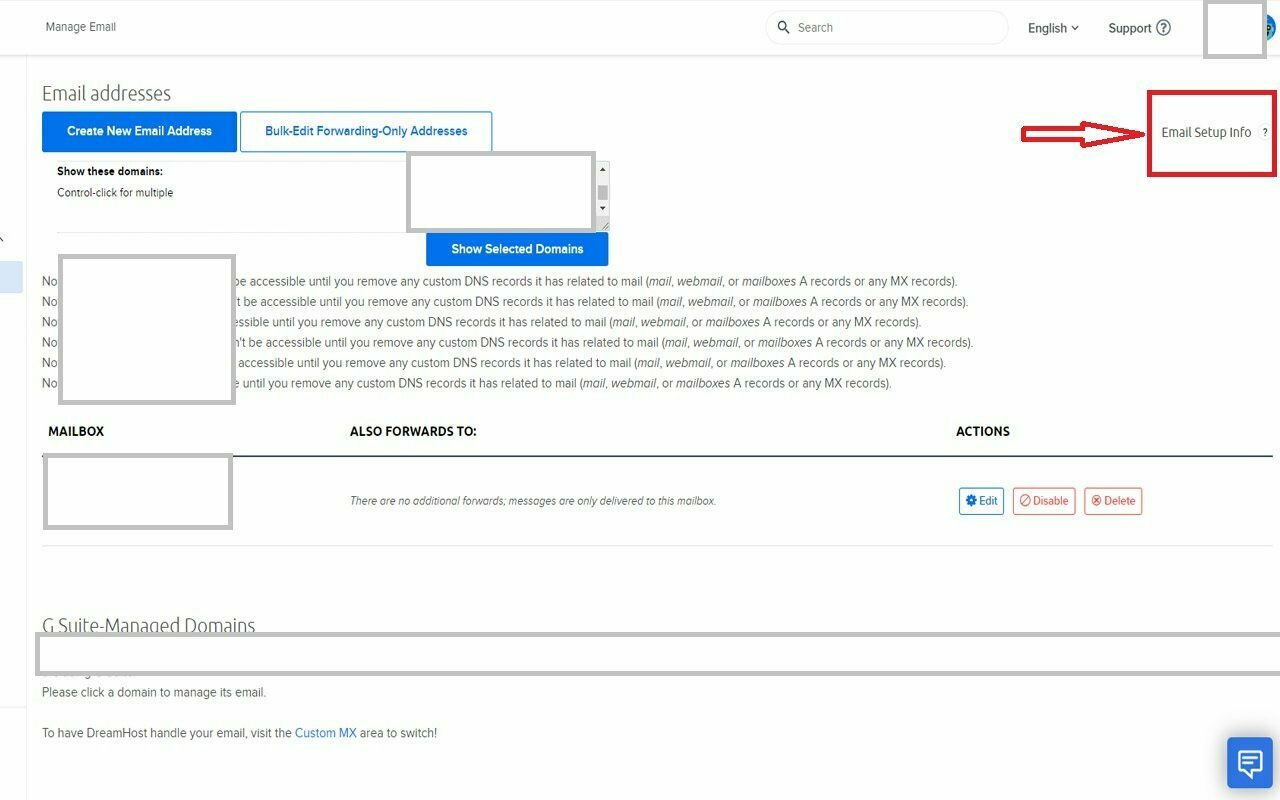
Open the Manage email page to quickly locate your email settings. Look for the Email Setup Info hyperlink in the upper left.
To open the quick access instructions for your email address, click the text.
Email Client Setup
Quick-access instructions for setting up Apple/iPhone Mail, Android, Outlook, or any other mail client across different devices.
Email Client Configuration
Incoming Settings
For IMAP: imap.dreamhost.com
For POP3: pop.dreamhost.com
IMAP | Port 993
POP3 | Port 995
Outgoing Settings
smtp.dreamhost.com
SMTP | Port 465
How to set up Dreamhost email on iPhone?
This is step by step to adding a Dreamhost email account to an iPhone mail client.
Tap the Settings badge on the home screen of your iPhone.
Step 1: Opens the Settings page:
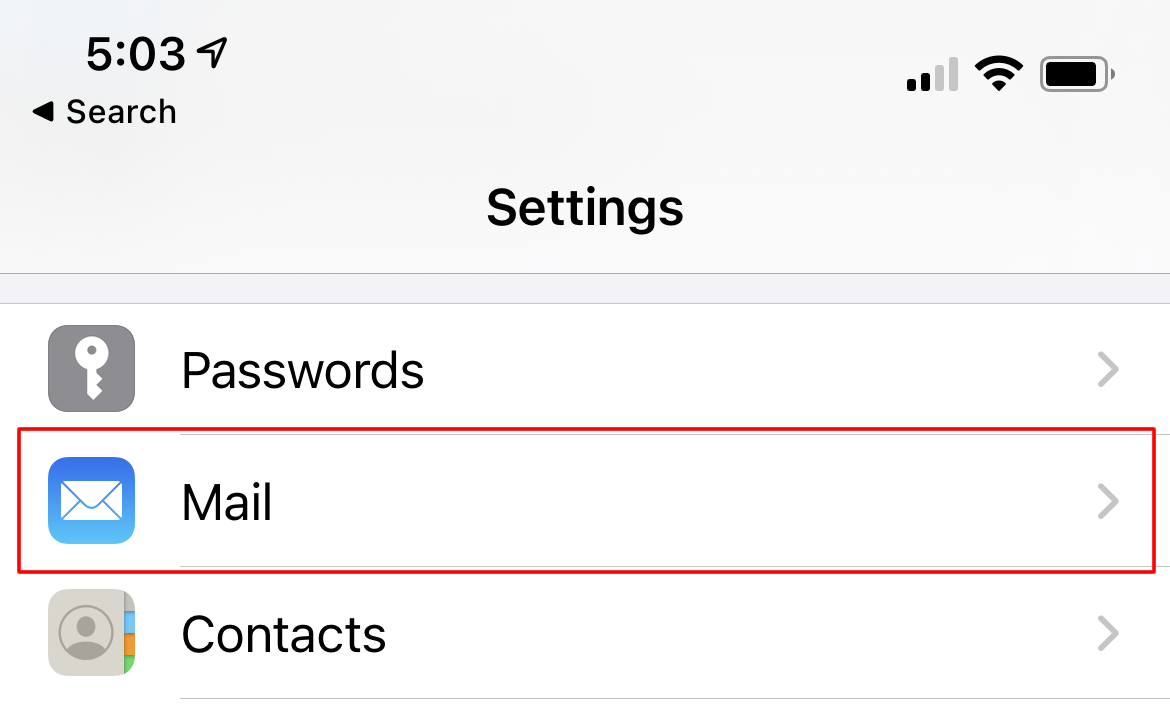
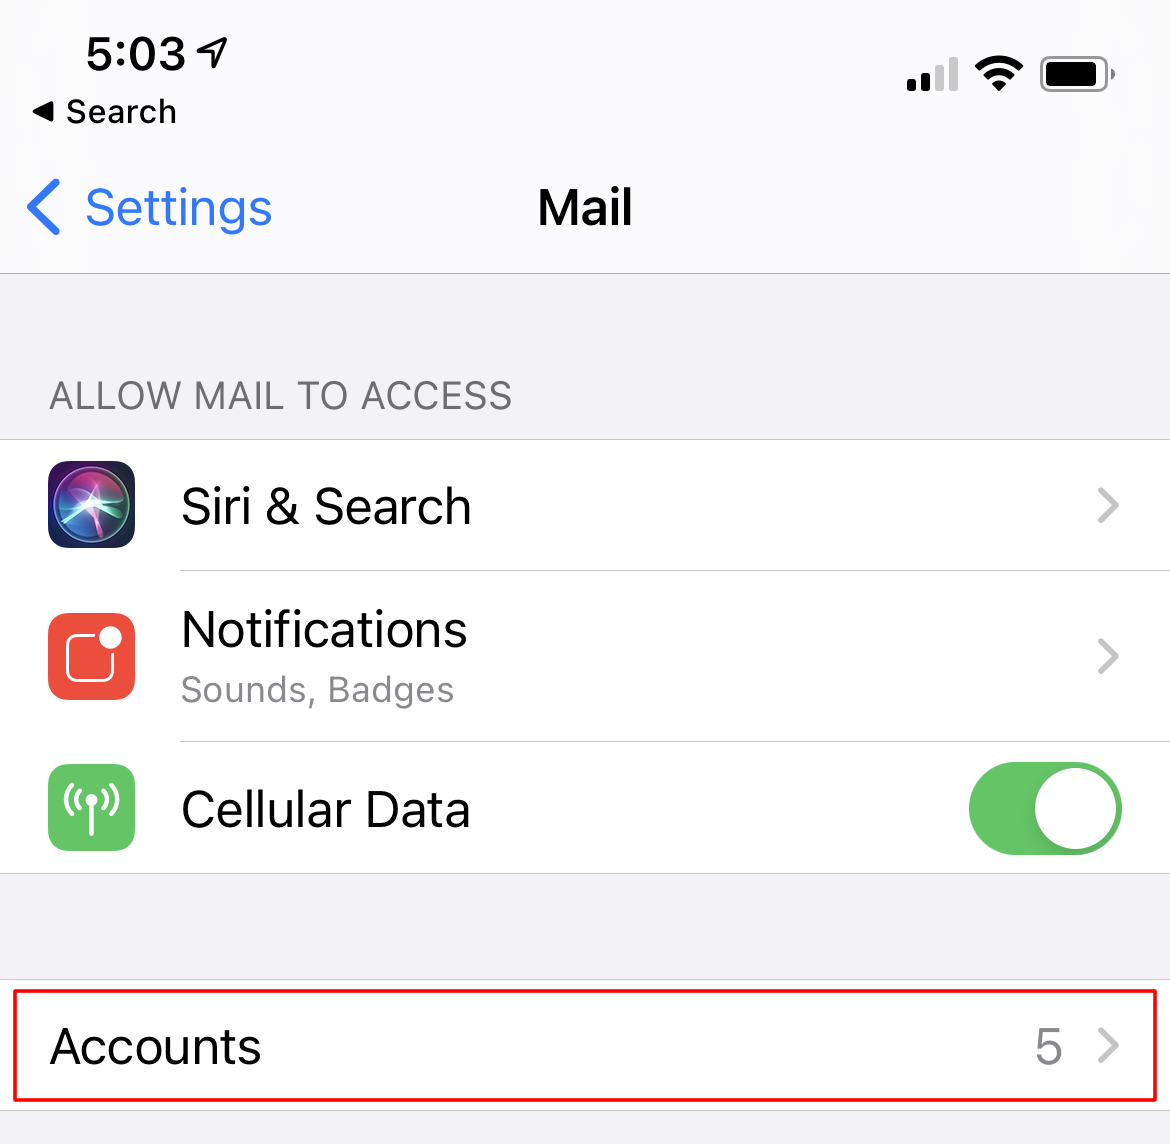
Step 2: Tap Mail.
Step 3: Tap Accounts.
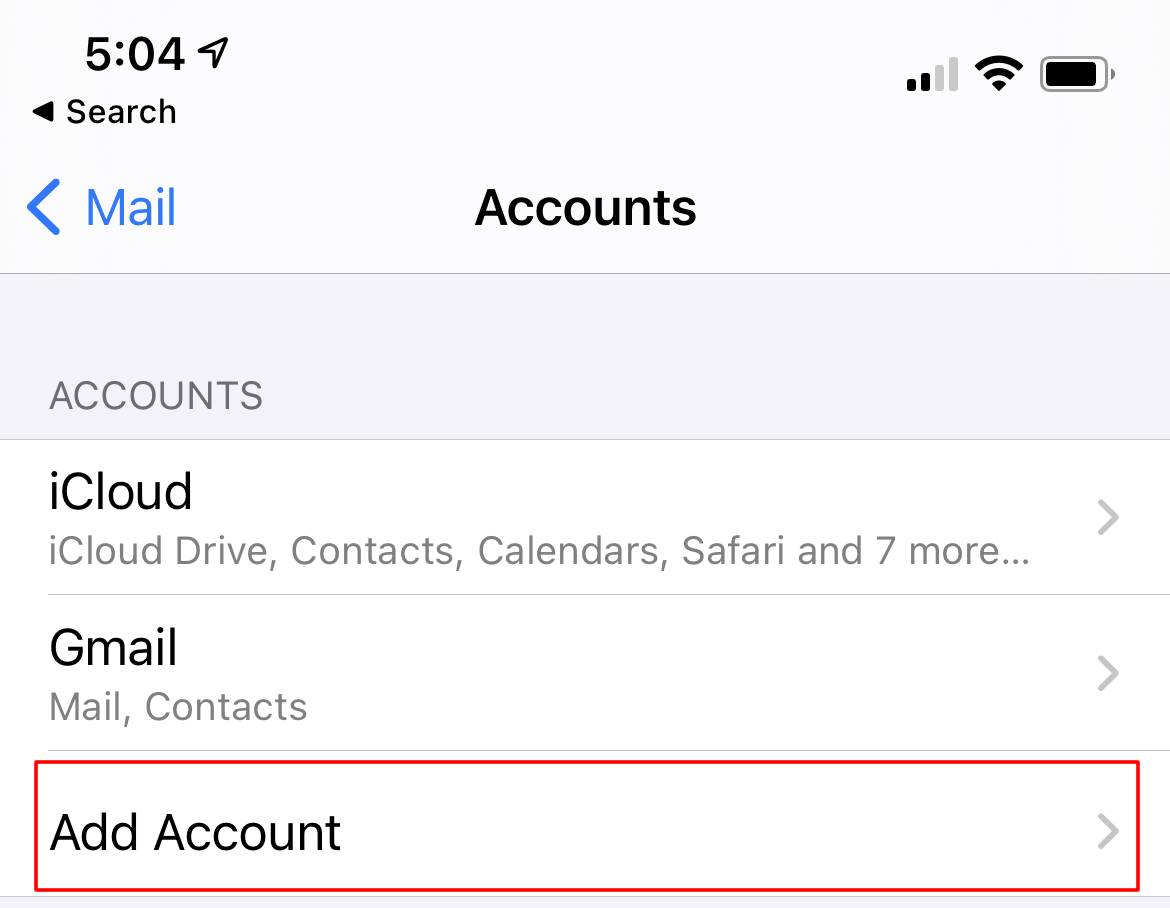
Step 4: Tap Add Account.
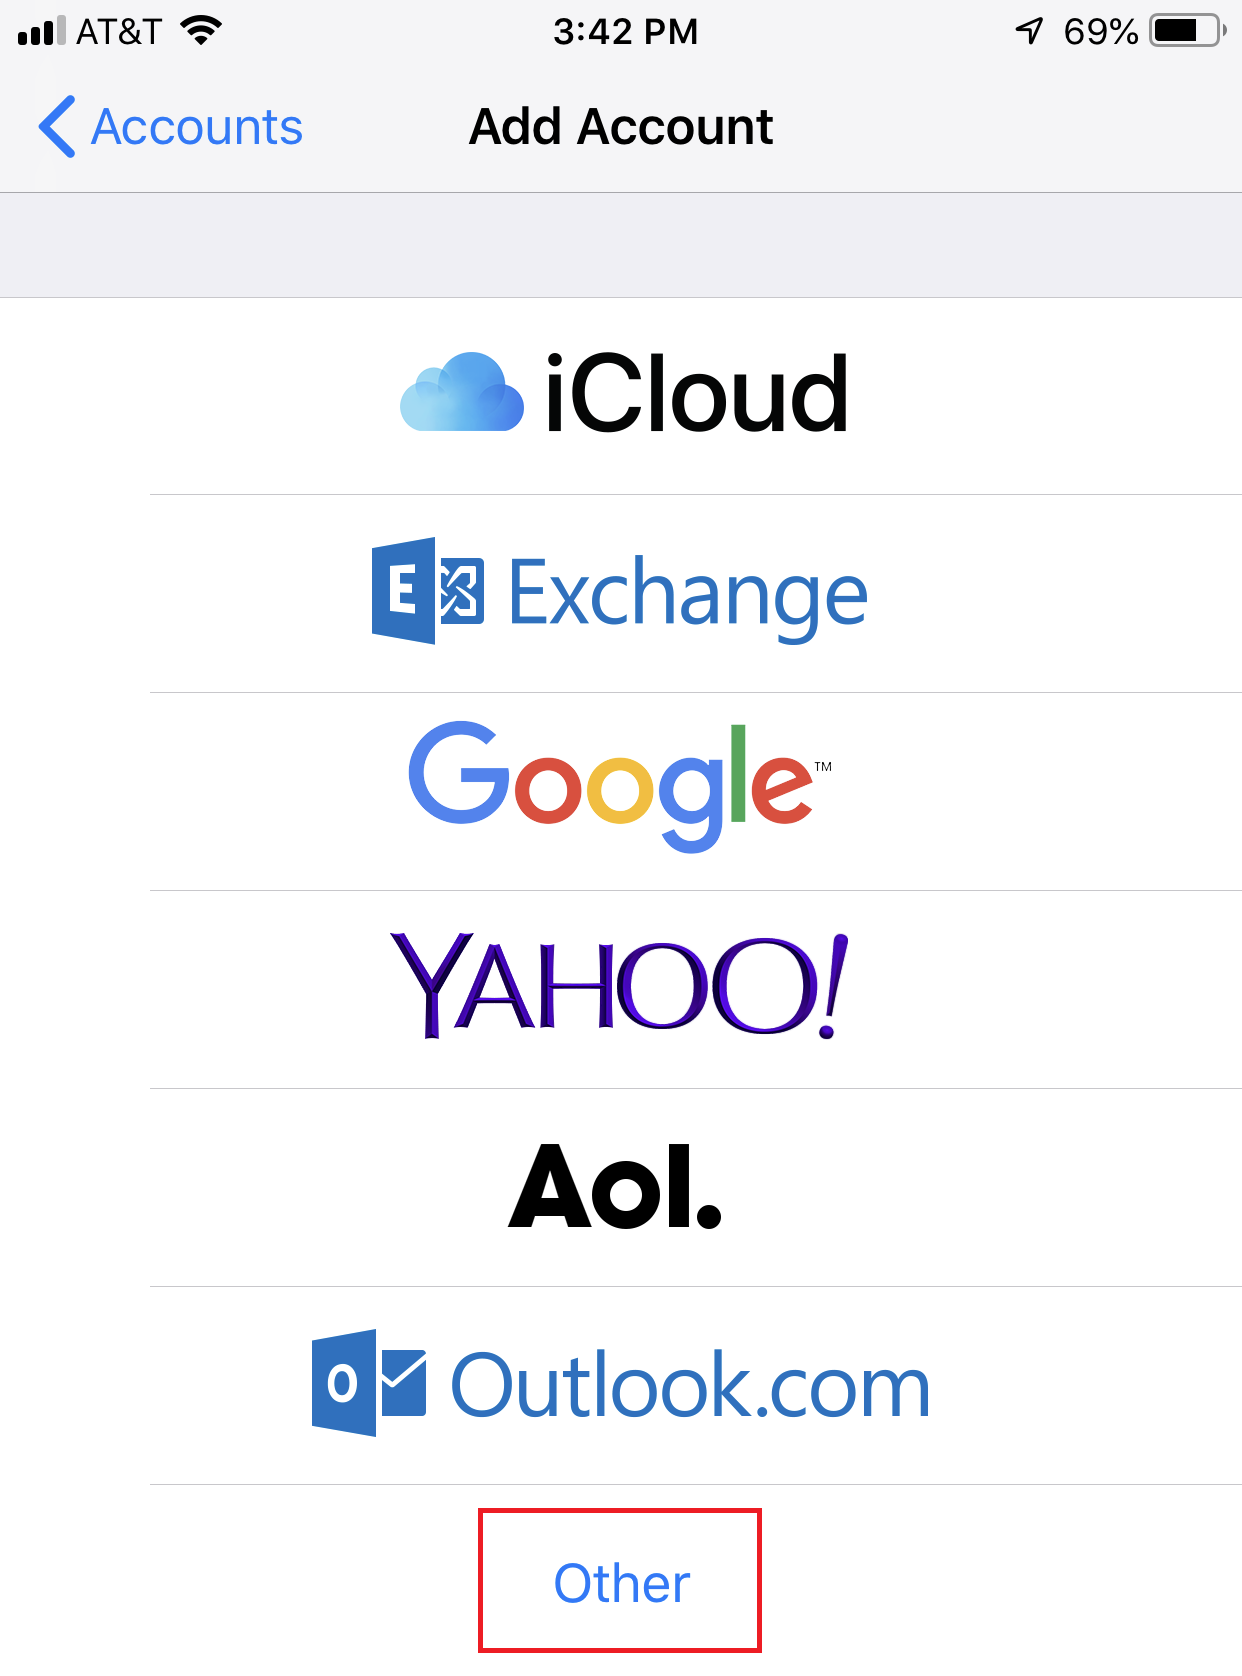
Step 5: Tap Other.
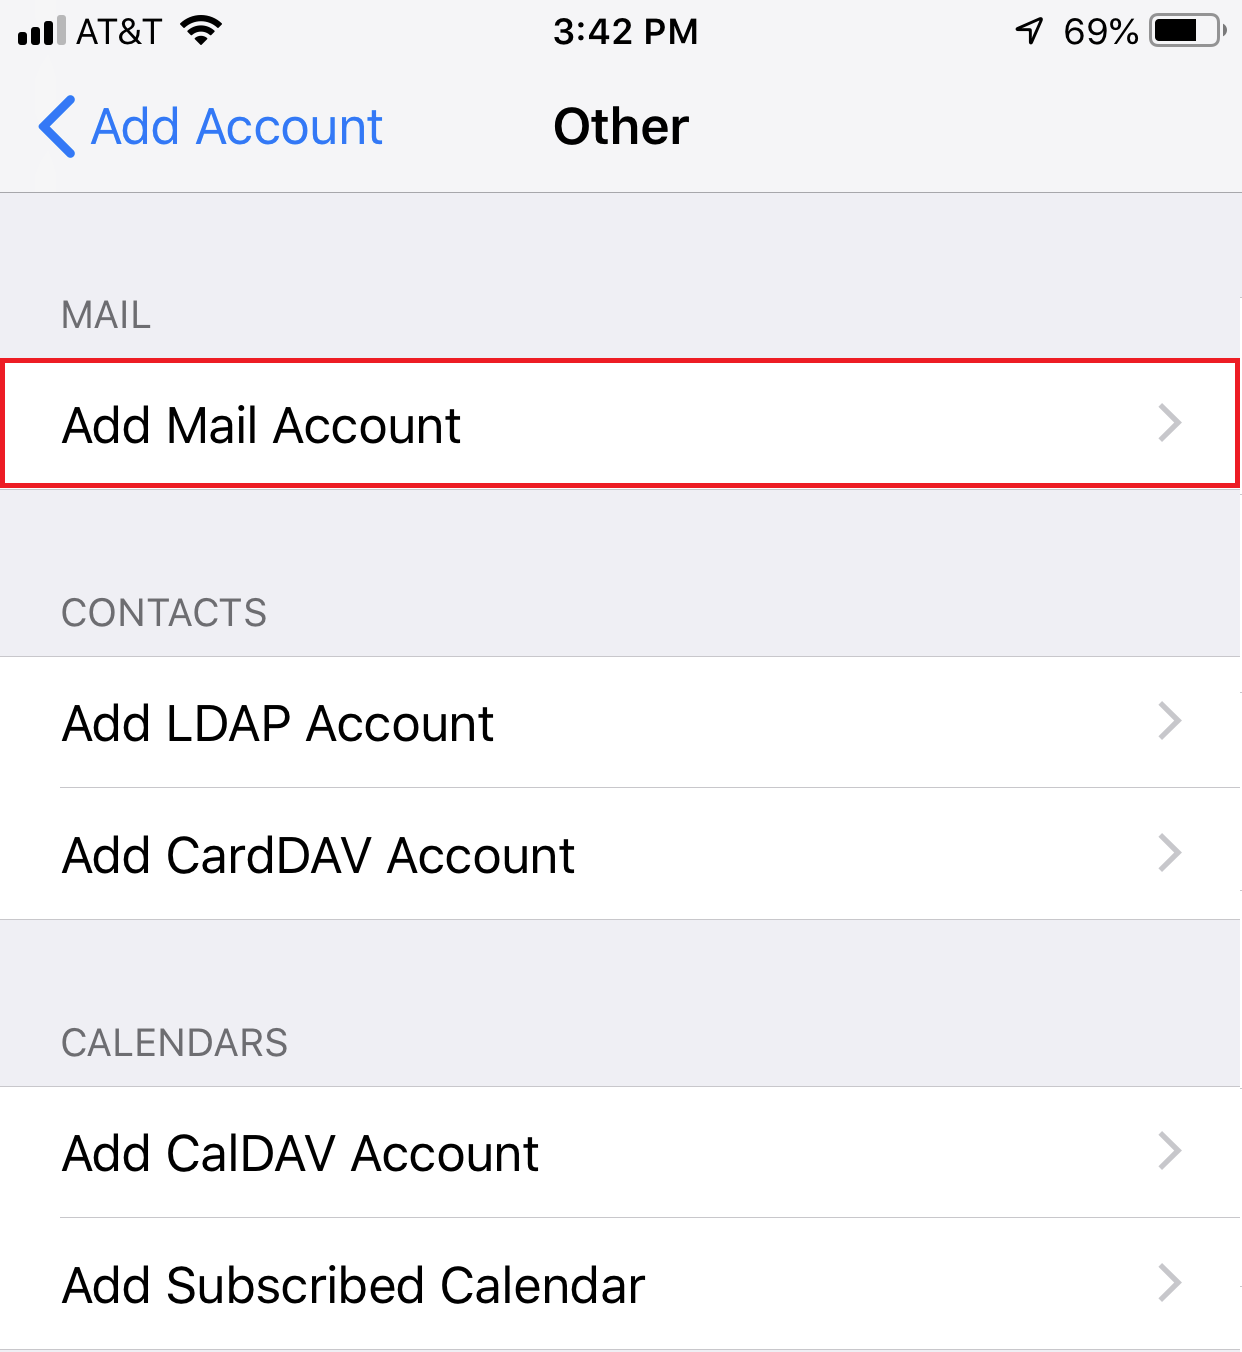
Step 6: Tap Add Mail Account.
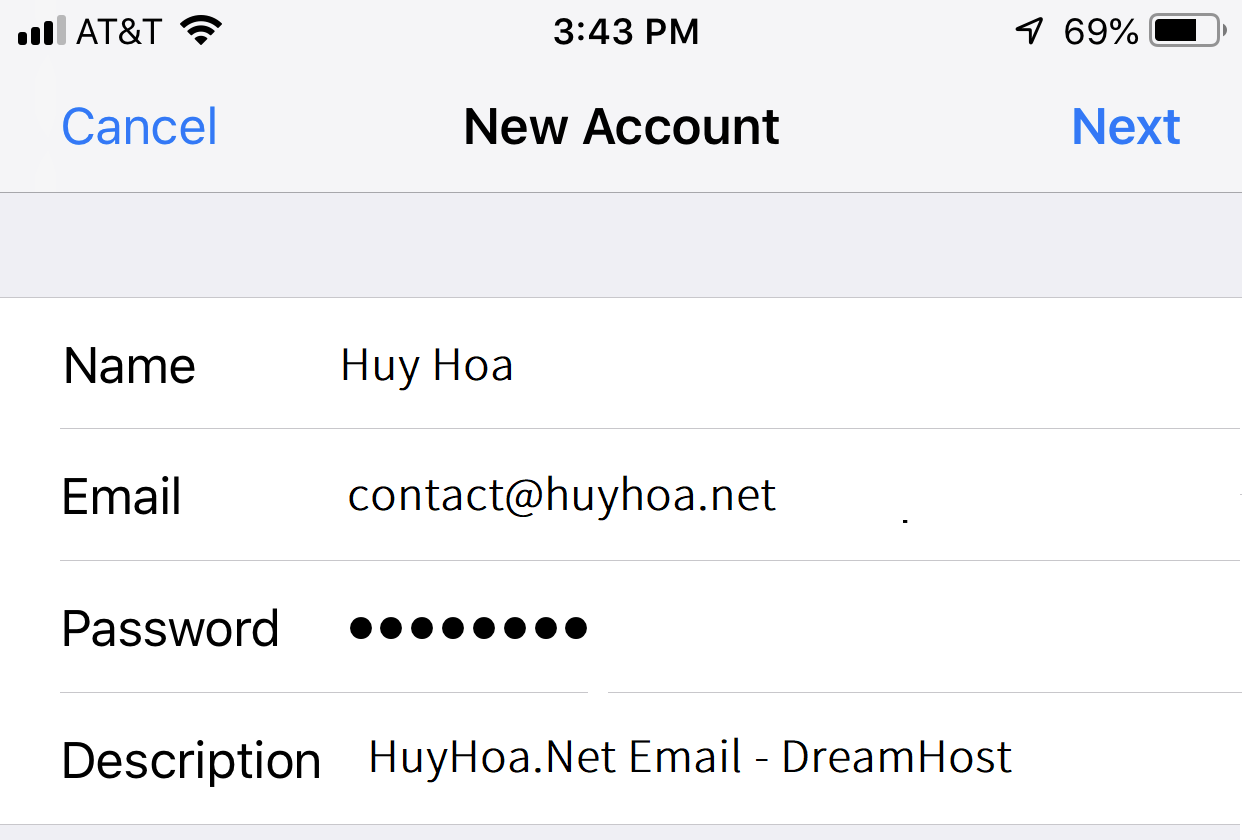
Opens the New Account Page:
Step 7: For your email account, enter the following information:
- Name: This is your name that appears at the receiving end.
- Email: This is your email address. It’s where replies are sent and should be similar to your username.
- Password: Your password.
- Description: Description of this account. This is the name of the address that you see on your phone’s ‘Settings” page.
Step 8: Once you have completed entering the new account details, tap Next In the upper right corner.
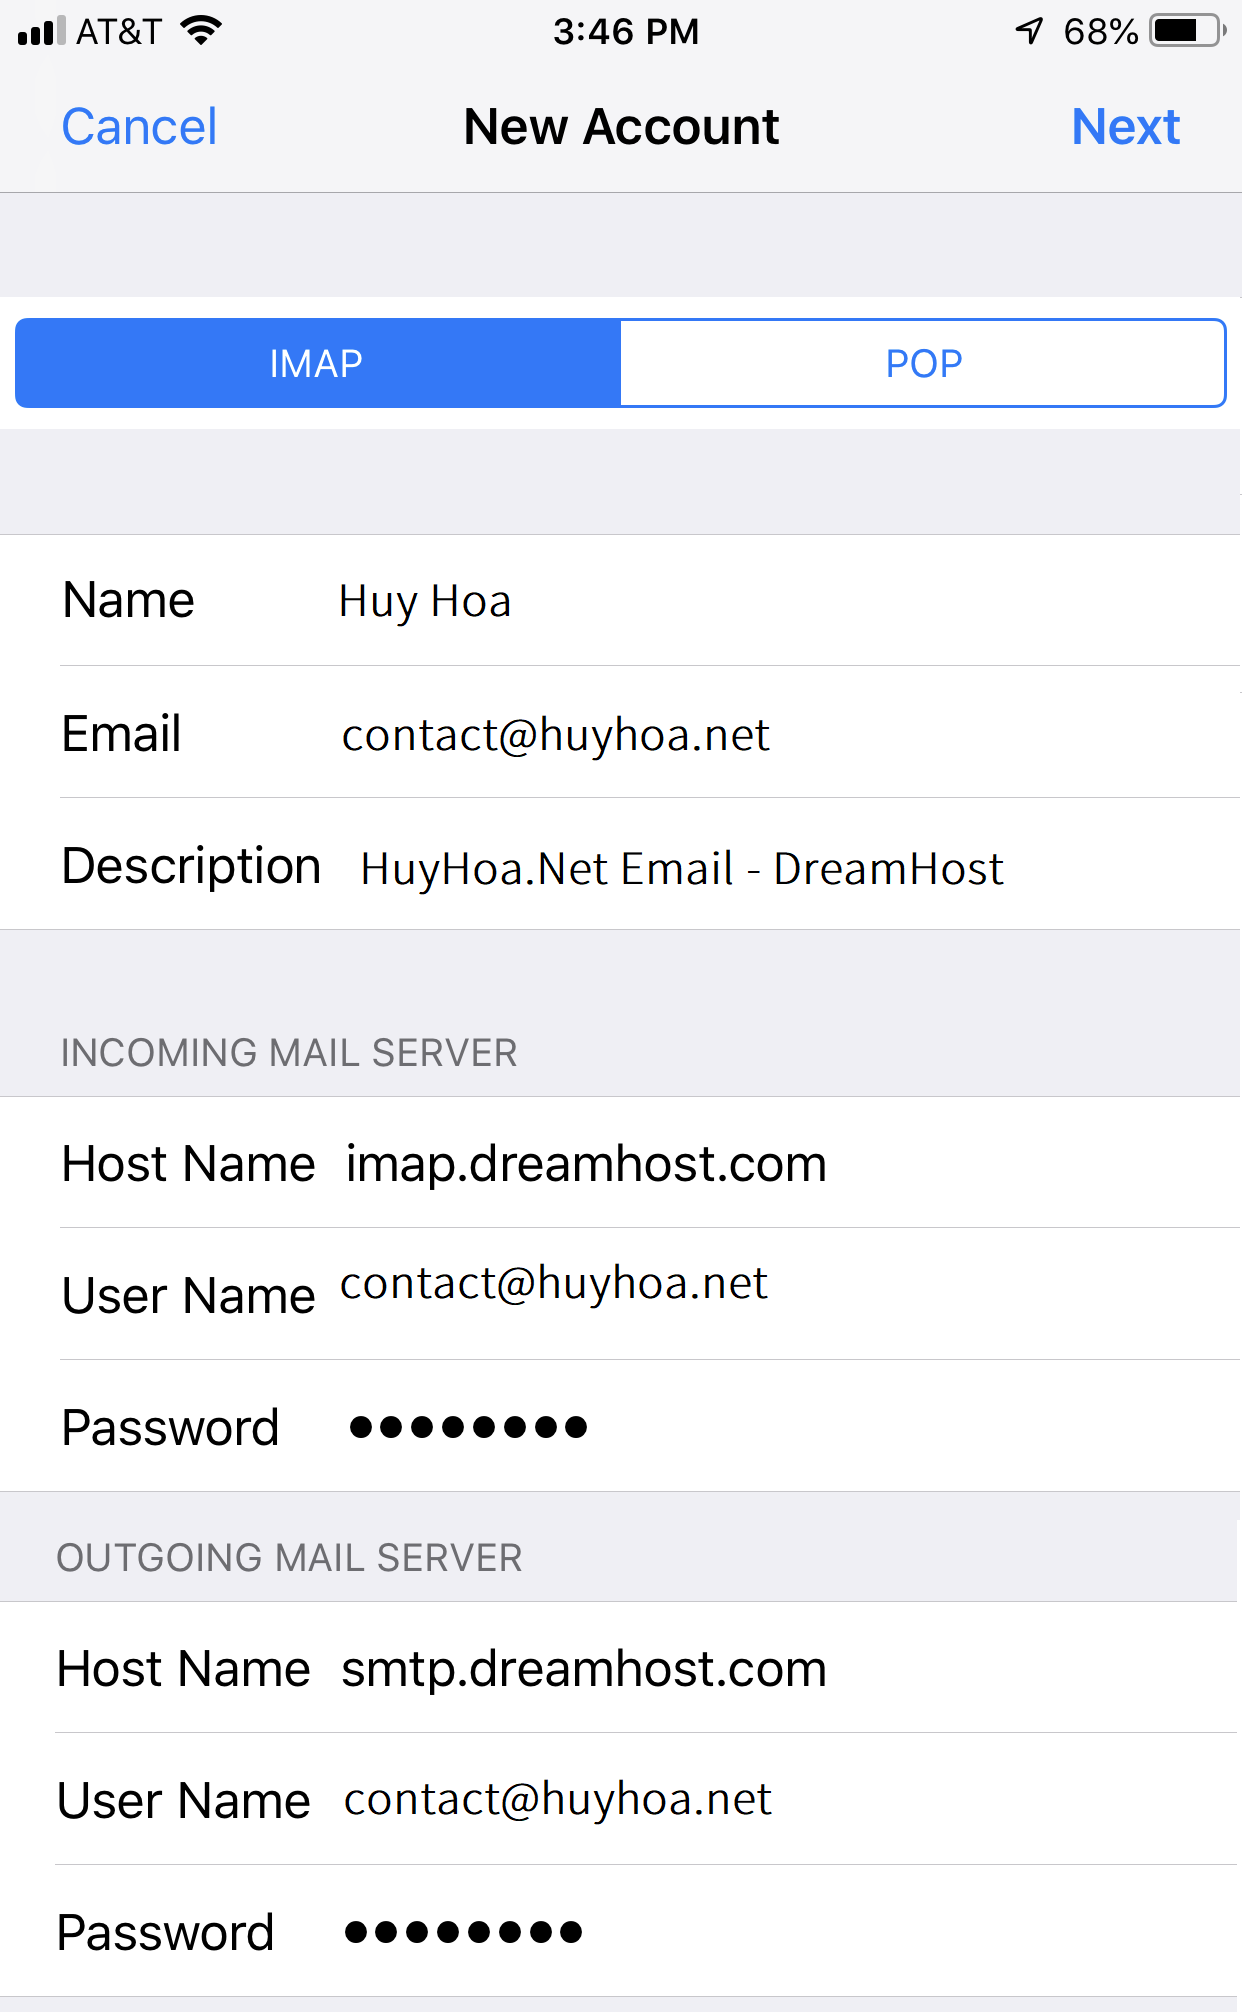
Opens the MAIL SERVER Settings page:
Step 9: After highlighting ‘IMAP’, enter the following information:
INCOMING EMAIL SERVER
- Hostname: Either imap.dreamhost.com or pop.dreamhost.com.
- Username: [email protected] (the email you are accessing).
- Password: Password to the email address. You can reset it by clicking on the Edit link next to the address if you aren’t sure.
OUTGOING EMAIL SERVER
- Hostname: smtp.dreamhost.com
- Username: [email protected] (the address to which you are logging in).
- Password: Password to the email address. You can reset it by clicking on the Edit link next to the address if you aren’t sure.
Step 10: Once you have entered the details for your new mail server, tap Next In the upper right corner.
DreamHost’s mail server has been contacted to verify your email account.
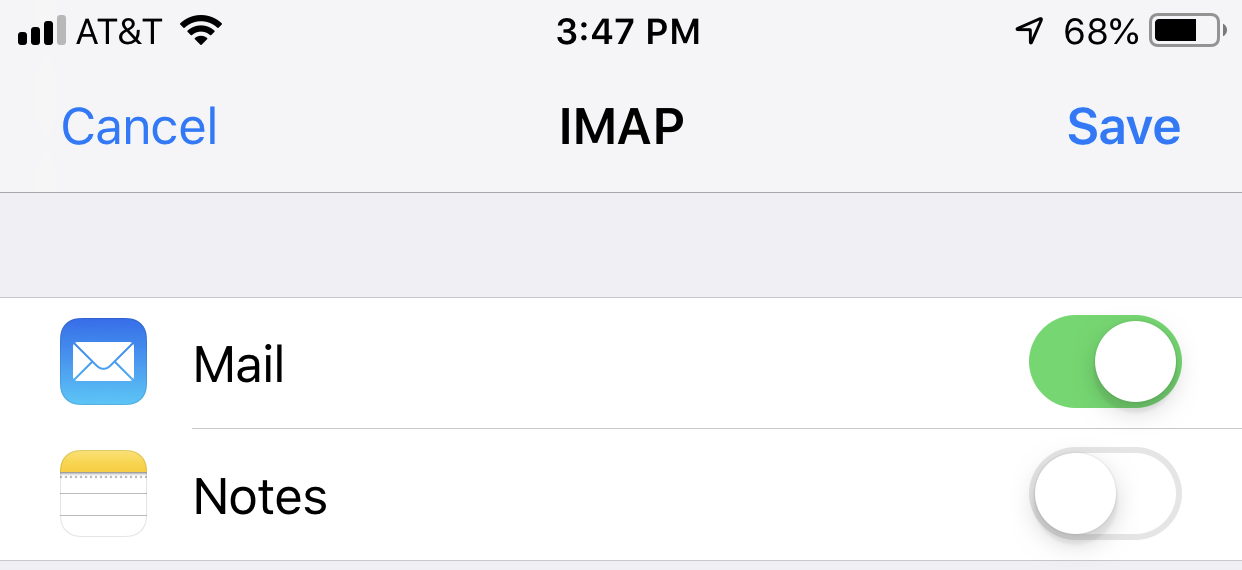
After your email account has been verified successfully, you will see the following page. This page allows you to save your mail account:
Step 11: To finish setting up your new mail account, tap Save in the upper right corner.
Change DreamHost email Secure settings on iPhone
When you create a mail account, secure settings are automatically enabled. This means that your port numbers will be set to use SSL to connect to the mail server.
These steps will allow you to view your settings:
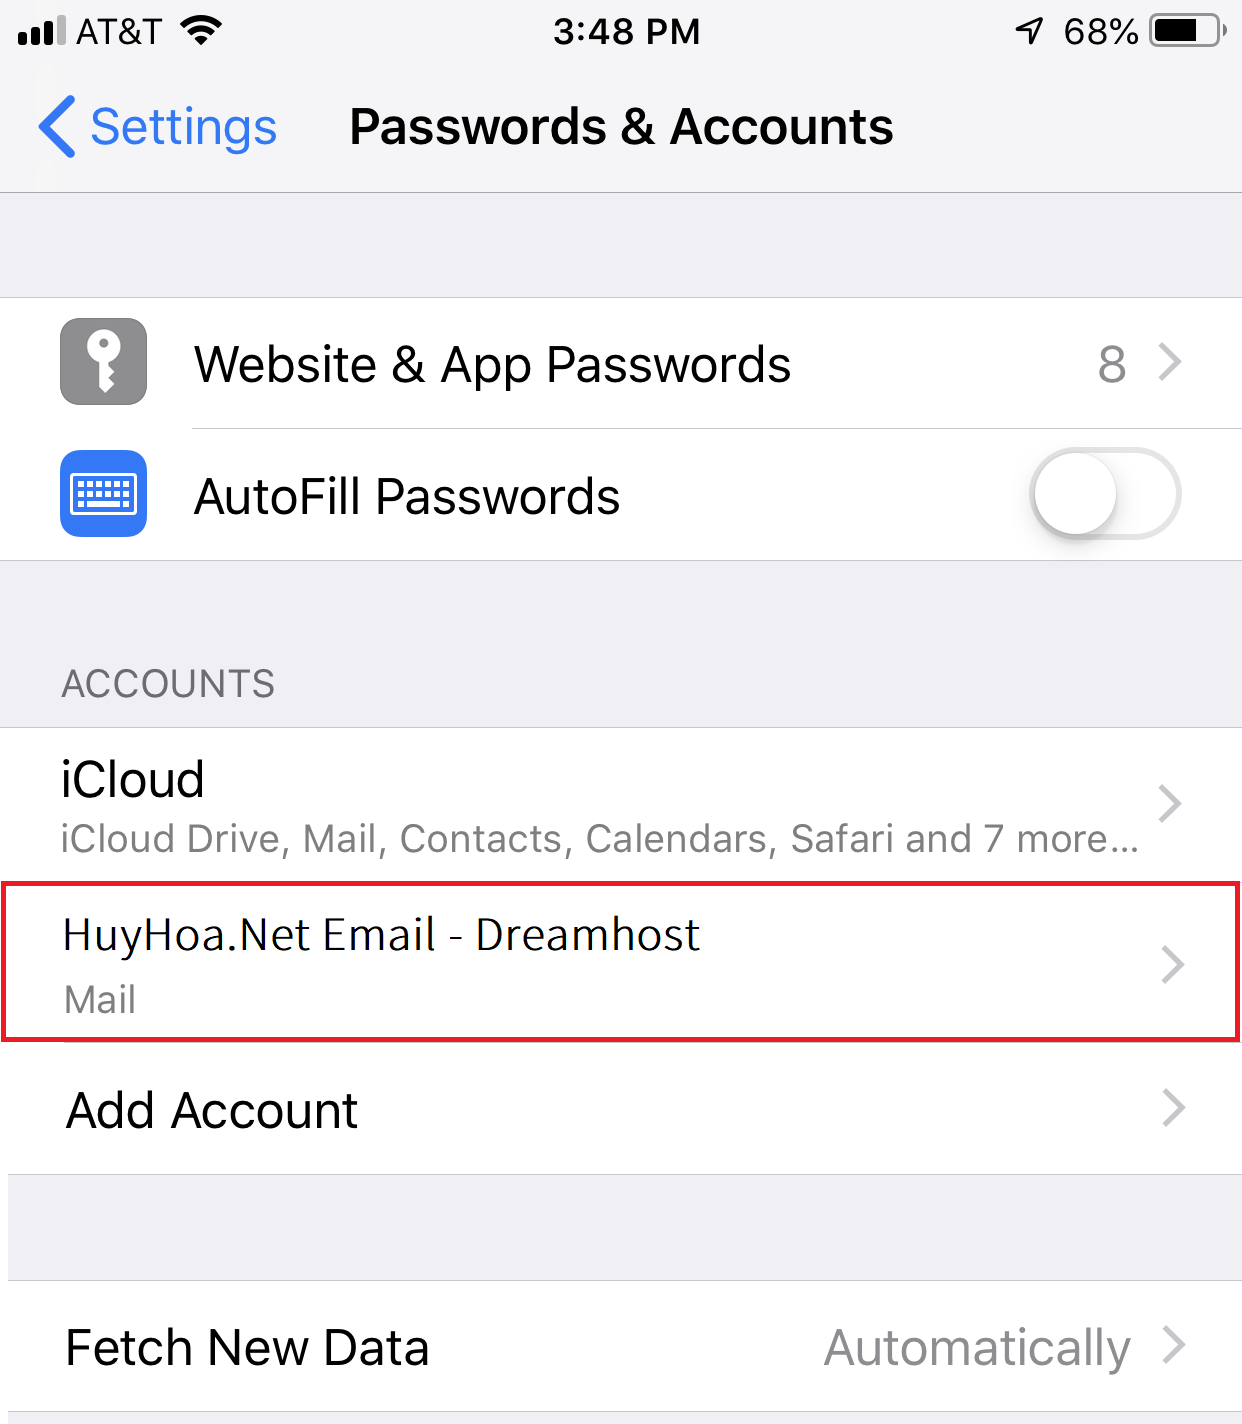
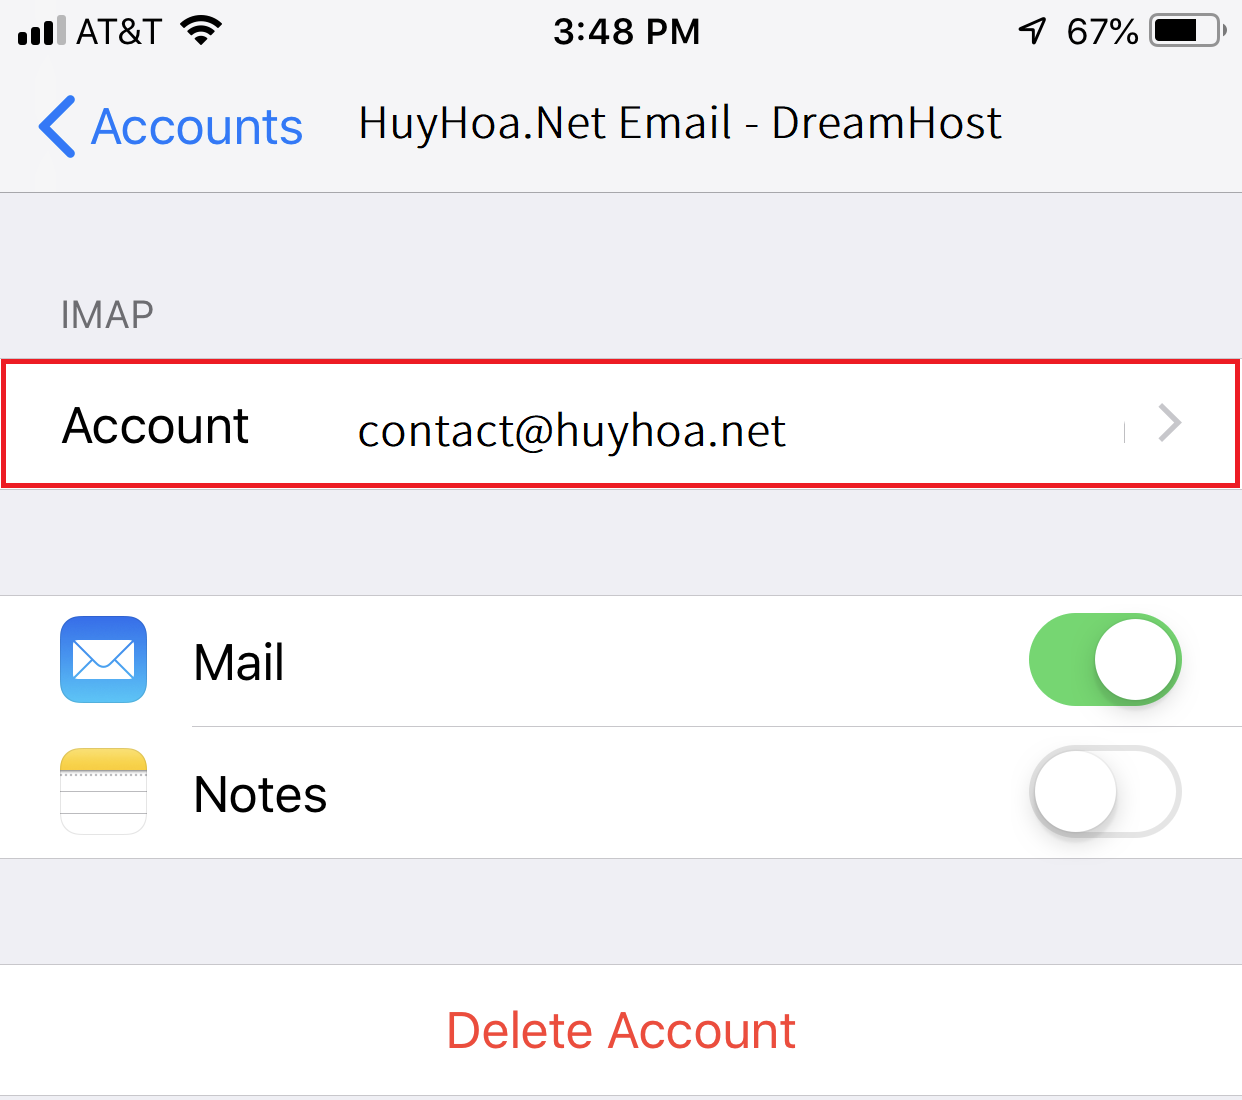
Navigate to “Settings > Passwords and Accounts“.
Tap a DreamHost email account.
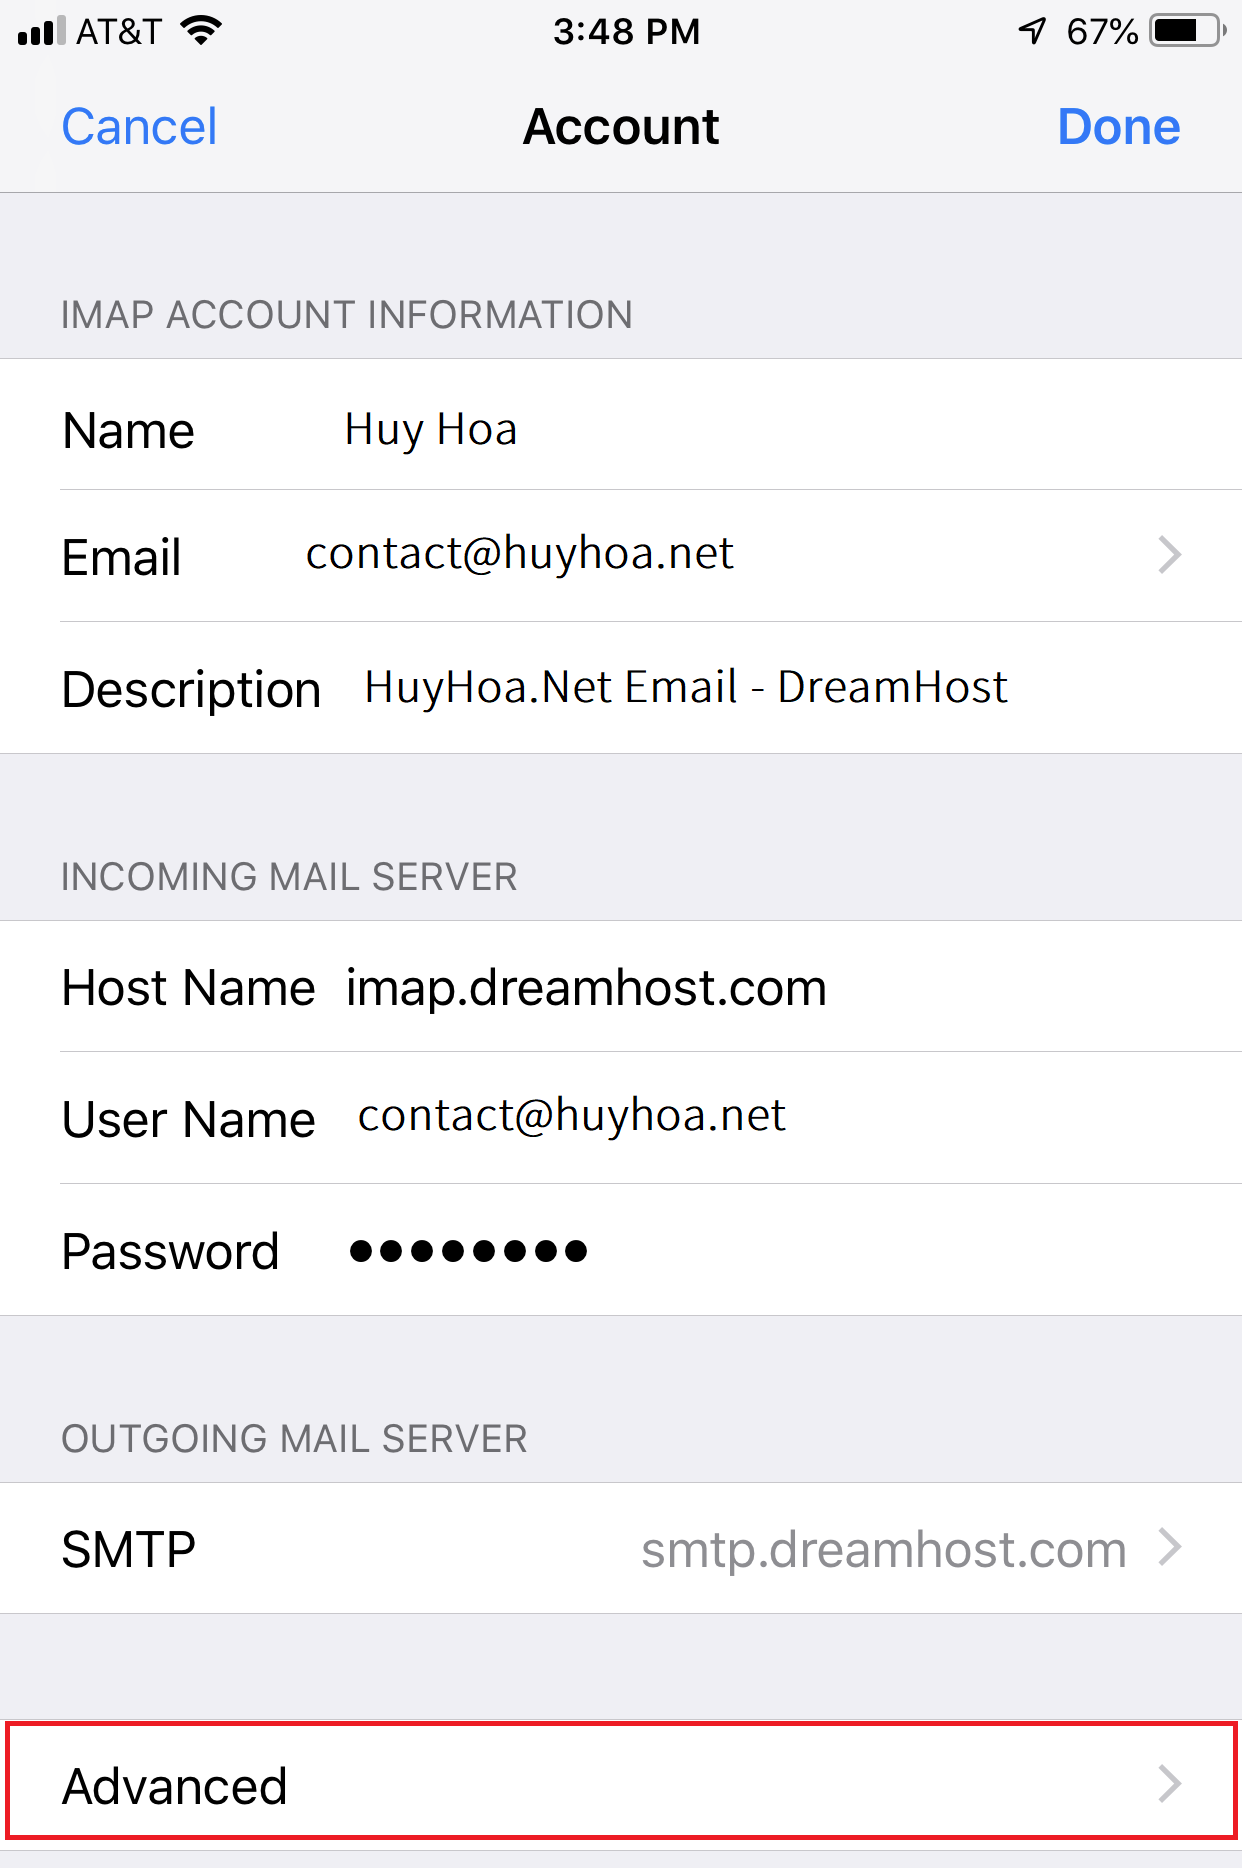
To view your basic settings, tap ‘Account‘
Tap ‘Advanced‘ to view your security settings.
Scroll down to see all settings
iPhone mail client troubleshooting
I have added a DreamHost email account to my iPhone but it won’t connect.
Your iPhone detects all settings and connects automatically to your mailbox. Sometimes, however, the connection may not be successful the first time it attempts.
Sometimes, it may take several taps to activate the Connect button before it connects correctly.
This behavior is caused by a known problem in the iPhone’s mail program.
If you have sync problems, the Advanced section can be modified as follows:
To allow IMAP clients to communicate with DreamHost servers, you must change the IMAP Prefix to INBOX (all capitals).
Most desktop email clients function normally, but instead of showing the Inbox as a whole, they show the folders in subfolders.
To send messages, tap Sent Mailbox in the MAILBOX BEHAVIORS Section. Next, tap the folder that you want to use for sending mail (in the ON the SERVER section).
You will see a paper airplane beside the current selection.
The message “Cannot Verify Server Identity” appears
After you connect, you will see the following message if you enter a hostname other than imap.dreamhost.com
|
1 2 3 |
Cannot Verify Server Identity The identity of "mail.example.com" cannot be verified by Settings. Review the certificate details to continue. |
To ensure that the hostname you have entered connects to imap.dreamhost.com, please review the steps. This will fix the problem.
Emails are bounced with a ‘rejected by the server because it does not allow relaying‘ error.
Double-check your outgoing connection settings if you get a “relaying” error. Also, make sure you are using .dreamhost.com for your hostname and your username and password.
Push and Fetch settings
DreamHost email accounts do not support Push. Use Fetch or Manual.
I updated this post to provide more information and answer your question Melinda on how to access the Spam / Junk folder on your iPhone and how to move an email to the Spam folder.
How to access junk mail on iPhone?
There is no Junk Folder in Mail App on iPhone until you sent an email to the Junk / Spam folder.
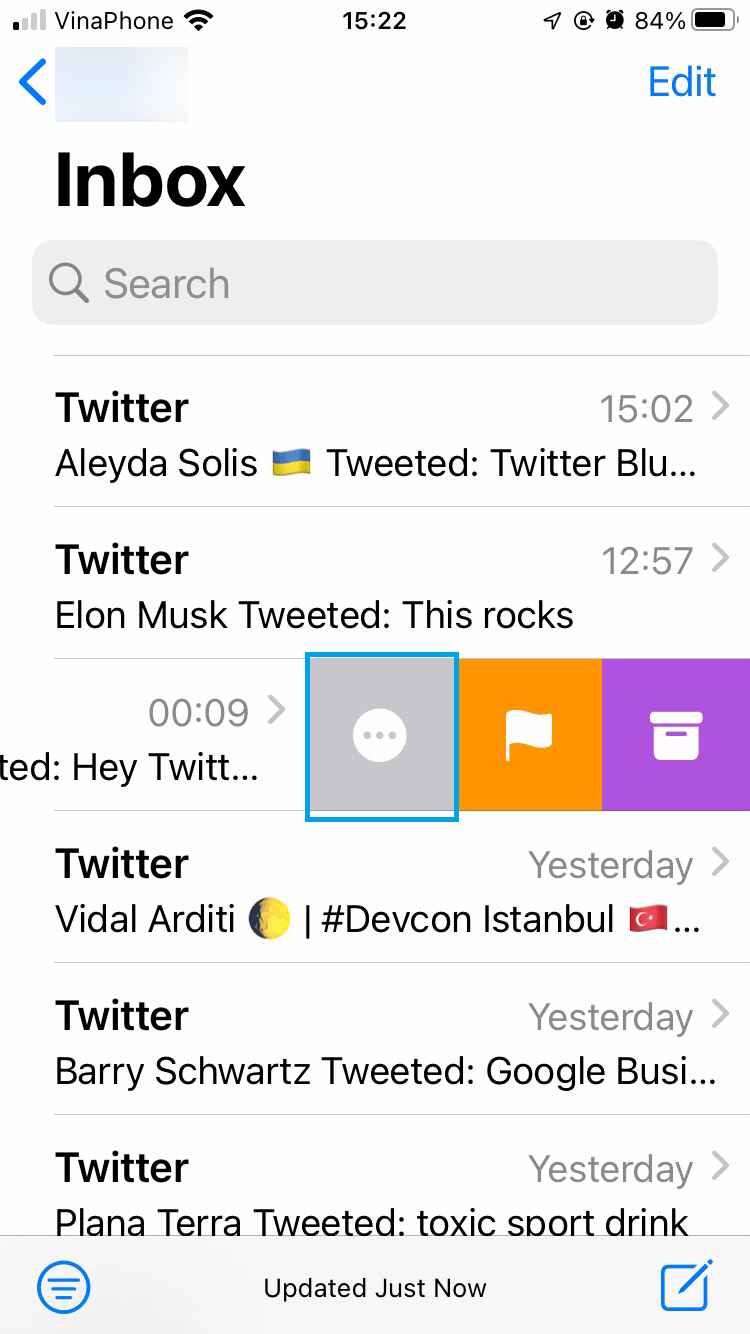
To move an email to the Junk/Spam folder, follow these steps:
- Choose the email you want to send to your Junk Folder(do not open it)
- Swipe it to the left. You will see on the right 3 choices: More (3 dots icon), Flag, and Trash (look at the image above).
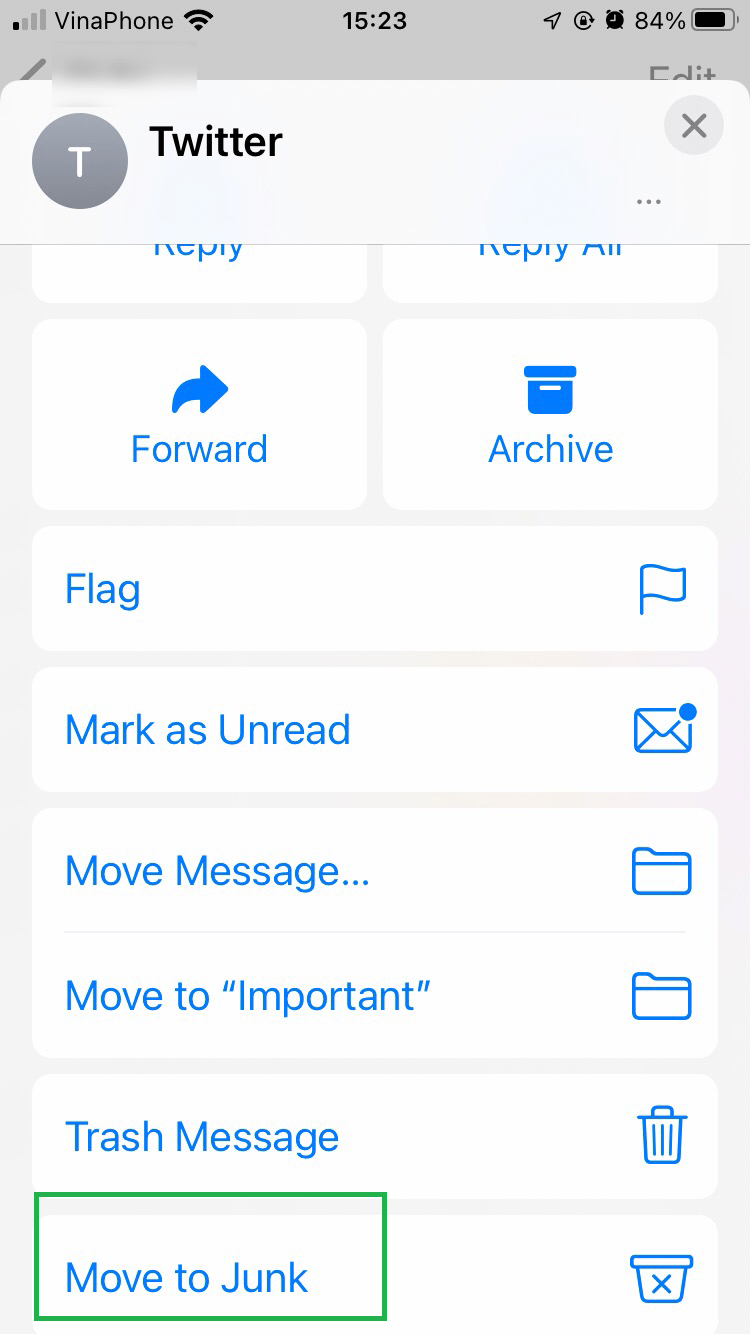
- Tap on the 3 dots icon (More). A new popup screen will show with 4 options: Reply, Reply All, Forward, and Archive. Tap on the name of the sender on that screen and swipe it to the top. Scroll up and you will see an option to move to Junk. Tap on that option, the email will be moved to the Junk folder.
Now, to answer the question How to access the spam folder on my iPhone, here is how you access the Spam/ Junk folder on the Mail app of any iPhone.
Open App Mail on your iPhone. You will see a list of all the mailboxes you have added. They will be divided into 2 areas. The upper area will give you quick access to the inbox of each mailbox.
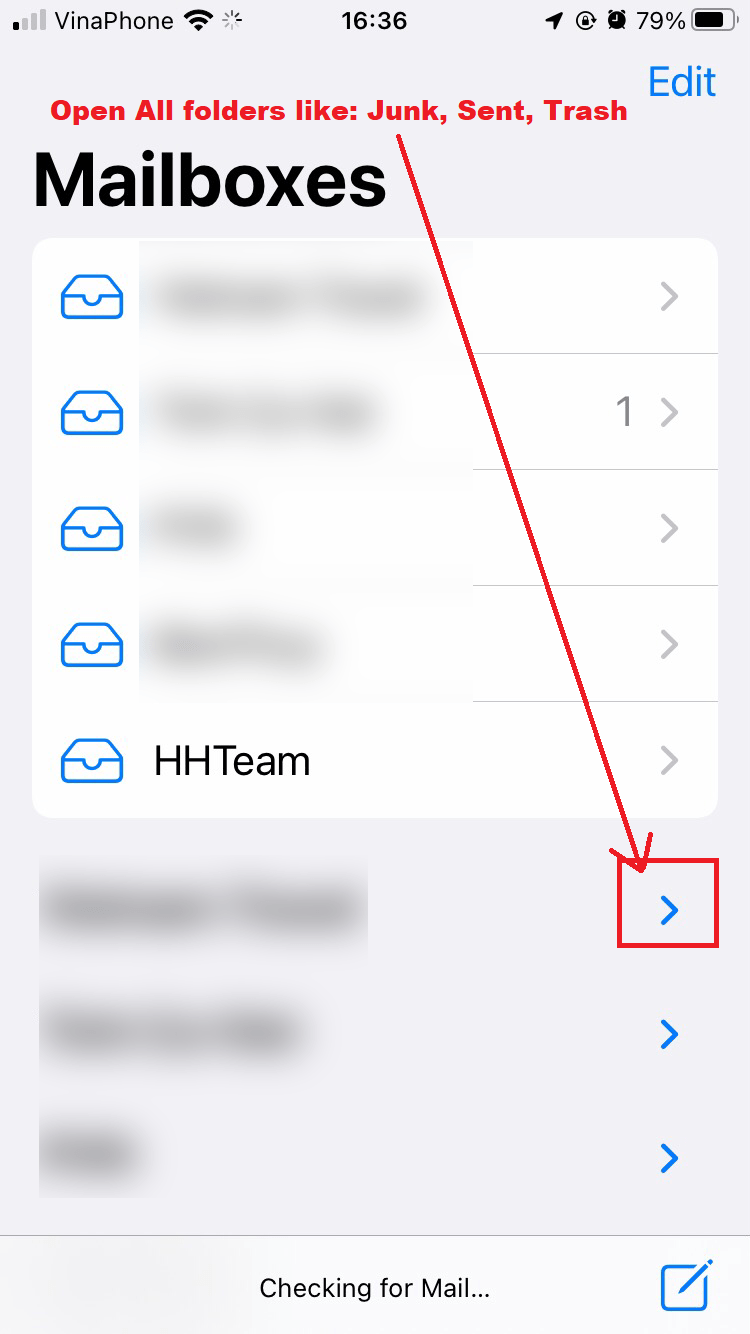
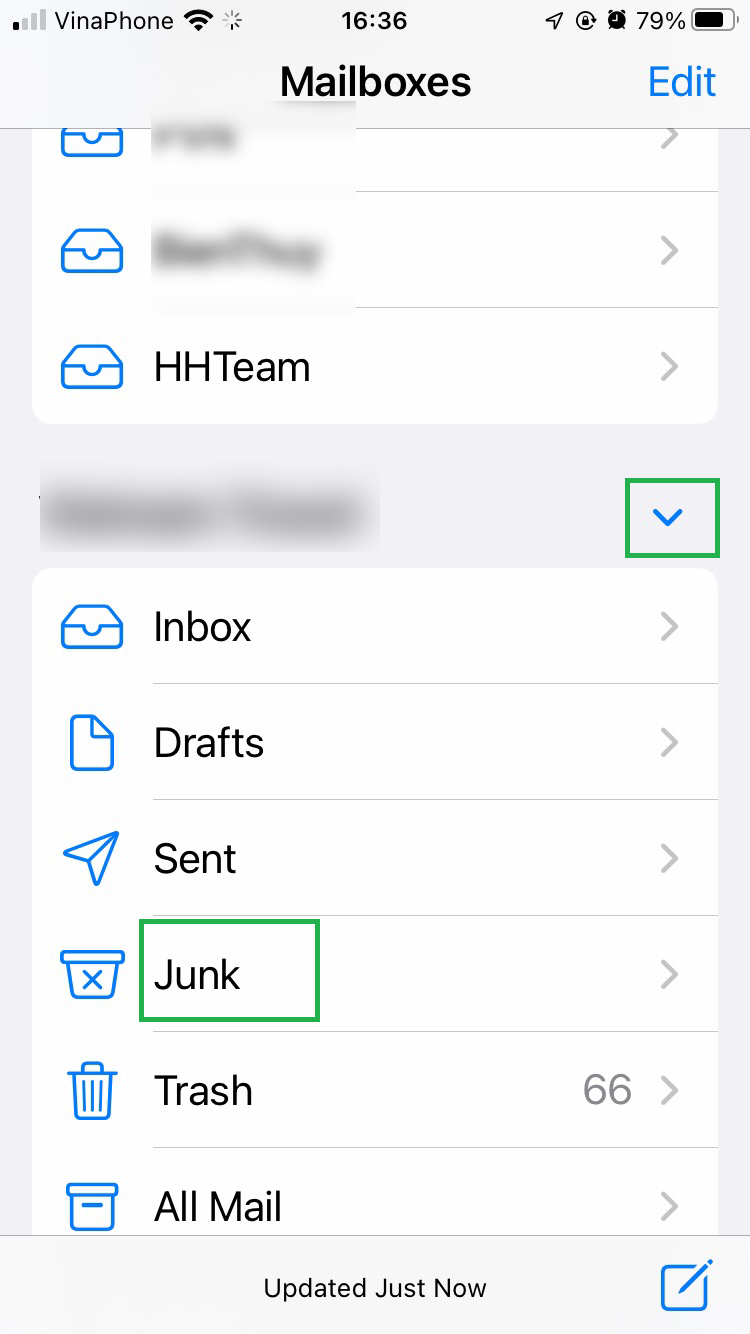
The bottom area (the mailbox name is the same as above but the text is bolder), gives you access to all the folders on the mailbox on the server such as Inbox, Junk, Drafts, Sent, and Trash. To access these folders, just click the arrow pointing to the right of each mailbox, it will be expanded and you will see these folders of that mailbox.
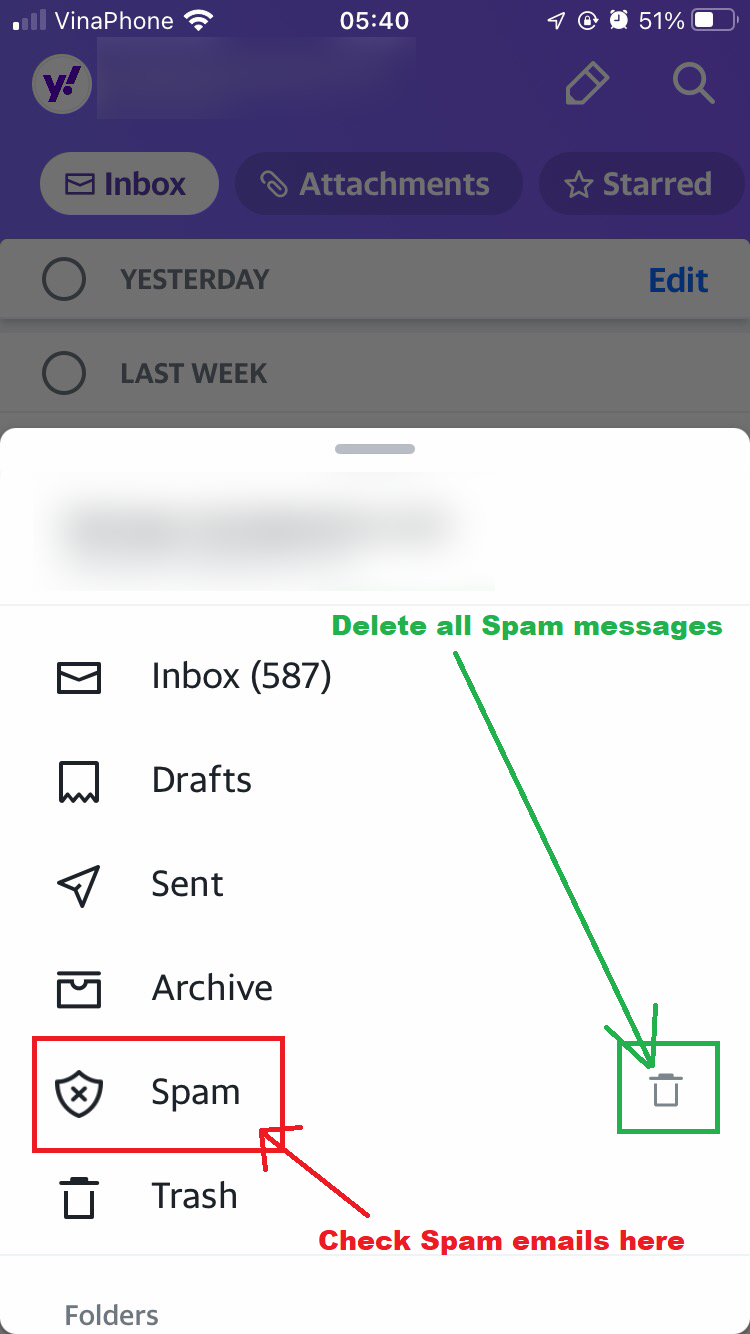
If you use Yahoo email services and use the YahooMail app on your iPhone, you can access the Spam folder by clicking the word Inbox, then a popup window will pop up including folders like Inbox, Trash, and Spam.
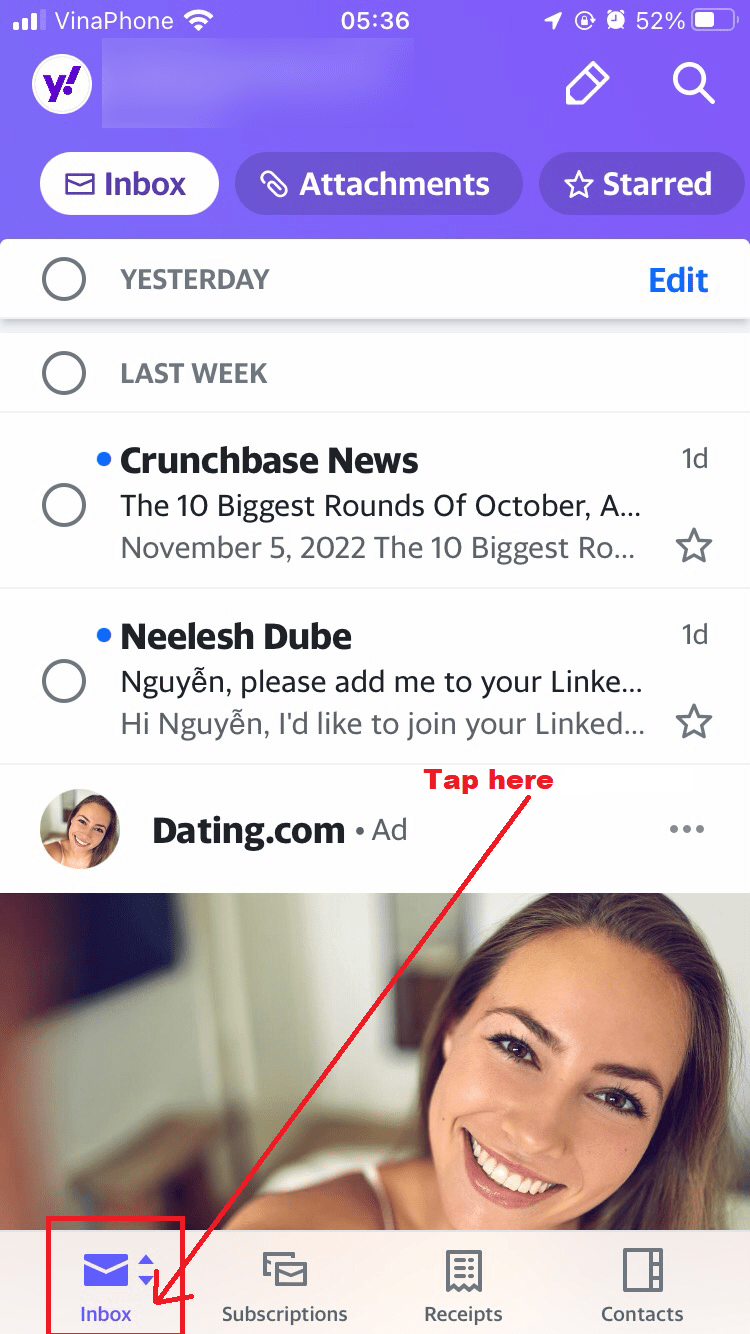
Tap the Spam folder to see emails marked as Spam. See the picture below to know more.



2 Comments
How do I set up the junk mail box on my iphone for dreamhost?
Thank you
Hi,
Thanks for the interesting question. I have updated the article to show you how to report and block an email as Spam on the iPhone’s Mail app. I also mentioned how to check the Junk/Spam folder on the iPhone’s Mail app.
Hope the answer helps you